
Bike Touring Gear
What to Bring on Your Bike Trip
This page focuses on gear for bicycle touring. To learn more about touring bicycles, visit our Bikes for Touring page.

Carrying stuff on your bike
Bicycle touring has traditionally relied on rack/panniers (saddlebags) and handlebar bag systems which are still the most prevalent. In recent years, bikepacking bags which attach directly to your frame, fork and handlebars without requiring racks have become more popular. Another option is to pull a bicycle trailer, which are compatible with any bicycle, keep a low profile and possess vast capacity. If the weight required is light, some cyclists take a backpack, but most prefer to keep weight off their body for comfort, ventilation and bicycle handling.
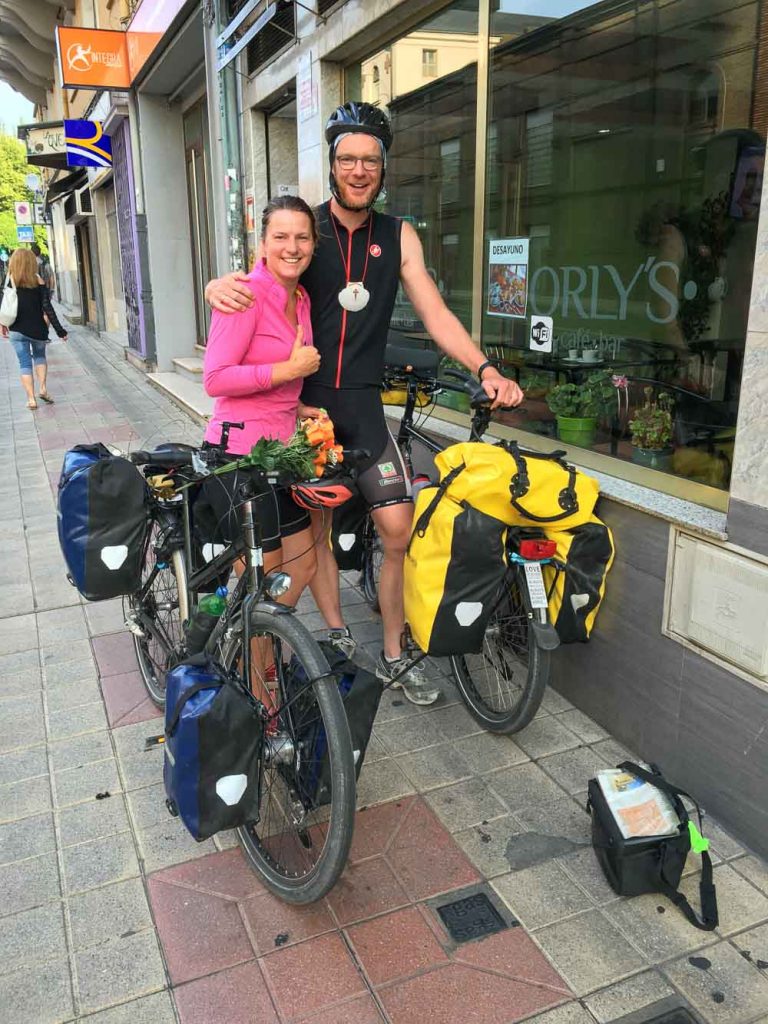
Racks, Panniers & Handlebar bags
This standard and time-tested setup for bicycle touring offers the best value for its carrying volume. A rear rack and pannier set is the building block for many, with extra capacity adding a front rack and panniers with a handle bar bag.
Benefits:
- Volume. The easiest way to get a lot of space. For long tours on roads, this is the way you’ll want to go.
- Value. Low cost for the volume,
- Options. Many manufacturers and varieties of products that are readily available for rent and purchase.
- Easy to remove. Most have a simple mechanism to unlatch and lift off of racks.
Considerations:
- Overloading your rear wheel. If you have wheels that are not strong and/or touring specific (36 spoke, in true), be careful with too much weight on your rear wheel as you could break spokes and handling will be compromised.
- Fighting a headwind or sidewind requires more effort, as you’re displacing a lot more air.
- Racks sometimes break on rough trails. If you’re worried about this, invest in a higher quality steel rack such as those made by Surly, Tubus, or Old Man Mountain.
- Pannier mounting attachments can also break. This is rare, and a healthy dose of duct tape will probably get you through your tour.
Racks are either steel or aluminum, and can be attached to the front and/or rear of your bicycle. Touring-specific bikes will have easy mounting eyelets for both front and rear racks. Most standard mountain and road bicycles will be compatible with rear racks, but bikes with front suspension forks have limited options for front racks. Racks (with or without panniers) are great for lashing extra gear on top, often used for longer/lighter items and dry bags containing sleeping pads, tents, sleeping bags.
Panniers (saddlebags) clip into or hang from your racks, and offer plenty of storage solutions for a variety of touring scenarios. As the standard setup for road touring (paved and dirt) for years, many options are available across the budget spectrum. Some of the most popular bags are waterproof Ortlieb panniers, which come in large and small sizes.
Handlebar bags are very handy to store items that you use frequently while riding (snacks, guidebook, maps, multitool), personal and valuable items such as your camera, wallet and passport. These bags quickly detach to throw over your shoulder when you jump into a shop to grab a coffee or snack. They are fairly universally compatible and have a rigid mount to your handlebar/stem junction. Popular models are made by Ortlieb and Jandd.
Camino use: This is the most common setup on the Camino, with most cyclists attaching a rear rack and pair of large panniers to a mountain bike frame. If you don’t have front suspension, it is also worth considering running only a front rack and panniers, which takes weight off your rear wheel. Adding a backpack (hydration pack style) is also common for snacks and personal items. Many prefer instead a handlebar bag for valuables
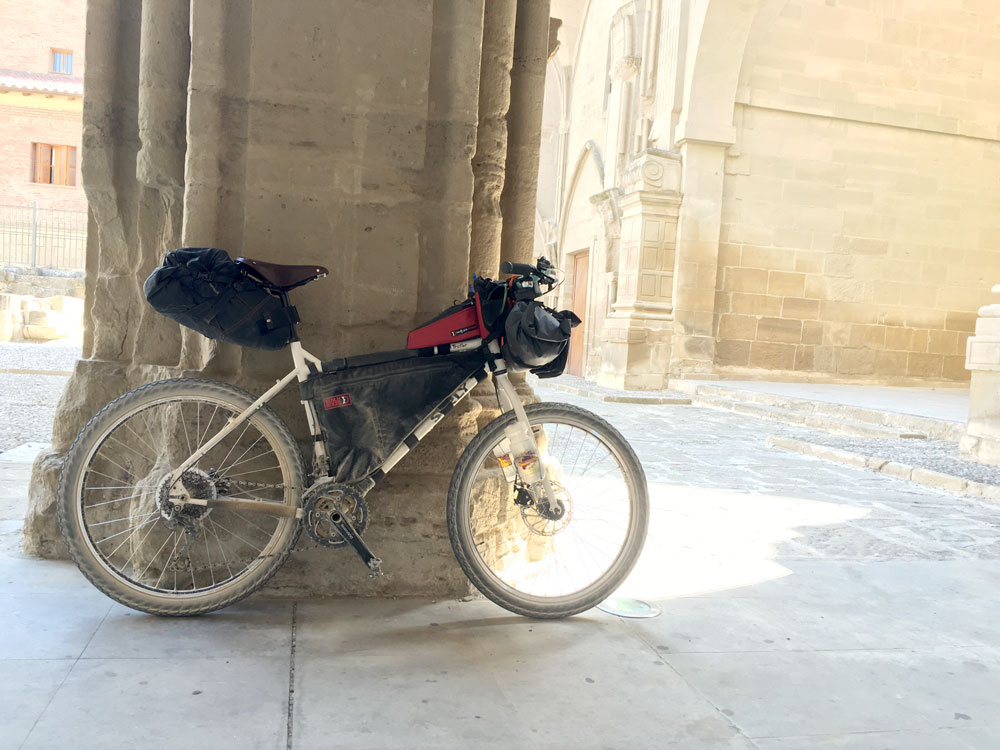
Bikepacking Bags
A full bike packing setup usually includes a frame pack, large seat pack, handlebar roll-type bag, smaller cockpit bags attaching to the top tube or stem/handlebar junction, as well as a possible hydration daypack. Most quality bags are waterproof and durable.
Benefits:
- Compatibility with almost any bike, specifically mountain bikes which often have limited options for rack mounts with suspension forks & fatter tires. Except for the frame pack, you can use the other bags in a modular fashion for other bikes if you want to do a lightweight road tour or take an extra jacket on a day ride.
- Narrow profile for nimble turning on single track trails (as well as passing others), avoiding taller rocks, and cutting through headwind
- Weight along the center of bike, allowing the bike to handle better than a pannier system.
- Durability & simple attachments for rough trails. Most attach using velcro loops around the frame and handlebars, which remove the possibility of breaking a rack.
- Eliminating the weight of rack(s). The total weight of this system is usually less than racks & panniers, but does have more limitations on total volume.
Considerations:
- Volume. You’ll have to pack lighter and smaller, which is usually a good thing anyways. 🙂
- Cost. To get the three main bags from a good company, expect to spend around $450. This is more expensive for the volume than a rack and pannier system, but offers unique benefits.
- Compatibility. Frame bag needs to be specific to your frame dimensions. Some handlebar roll bags will not fit into the drop bars on road bikes depending on size and cable configuration.
- Availability. Given the high demand, limited manufacturers and custom bags, it may take a few months to get the model you want. Check out Revelate Designs, Ortlieb, Porcelain Rocket as well as reviews on Bikepacking.com & Bikepackersmagazine.com.
- Managing multiple bags. While some love the option to sort and organize, others prefer keeping everything in two panniers on trailer dry bag, especially if you want to unload gear to deter theft. Bikepacking bags involve more time to remove from the bike.
Bikepacking bag setup:
- Frame pack: This bag fits inside the triangle of your frame and is used for storing denser items. It will need to fit the geometry of your frame, so important to either buy a model specific to your frame model and size, which is offered by companies like Surly and Salsa. If you have a small bike frame, the volume of this bag will be quite limited. Many are custom designed by sending your measurements into a manufacturer. This item is the most expensive of the bike packing bags given its custom nature. Stow your tools, spare parts, dehydrated food, and camp stove and cookware. Check out Revelate Designs, Porcelain Rocket, Ortlieb.
- Seat Pack/bag: These are oversized versions of the standard saddle packs, and are used for storing lighter items given their higher position on the bike (often clothing or sleeping bag). Some sides are rigid to allow for extended capacity. They attach with a velcro around your seat post and through your saddle bars.
- Handlebar bags: These differ from traditional touring handlebar bags in the fact that they usually are a dry bag with rolling ends that attaches to your handlebar with velcro loops, giving them a longer, rounder shape and limit easy access while riding. They come in various sizes, and it’s also possible to attach a standard dry bag via a handlebar harness (see Revelate model).
- Cockpit bags: A variety of bags that attach to either your top tube or handlebar/stem junction for convenient access while riding. Often called “feed bags,” “gas tank,” “jerrycan,” by the models introduced by Revelate Designs. They are offer a small bit of extra capacity, but are somewhat expensive for their volume.
- Anything Cage/Bags: This large multipurpose cage introduced by Salsa mounts onto your front fork side and allows attaching dry bags or oversized water bottles via compression straps. Read reviews.
- Water storage: As your frame pack takes up the space where you usually have the option of mounting water bottle cages on either your down tube or both sides of your fork. More and more adventure bikes will include bosses to bole the cages on here, or you can make your own clamping system. Frame geometry and front fork and rack design can limit options. Some riders will just take a small hydration backpack instead.
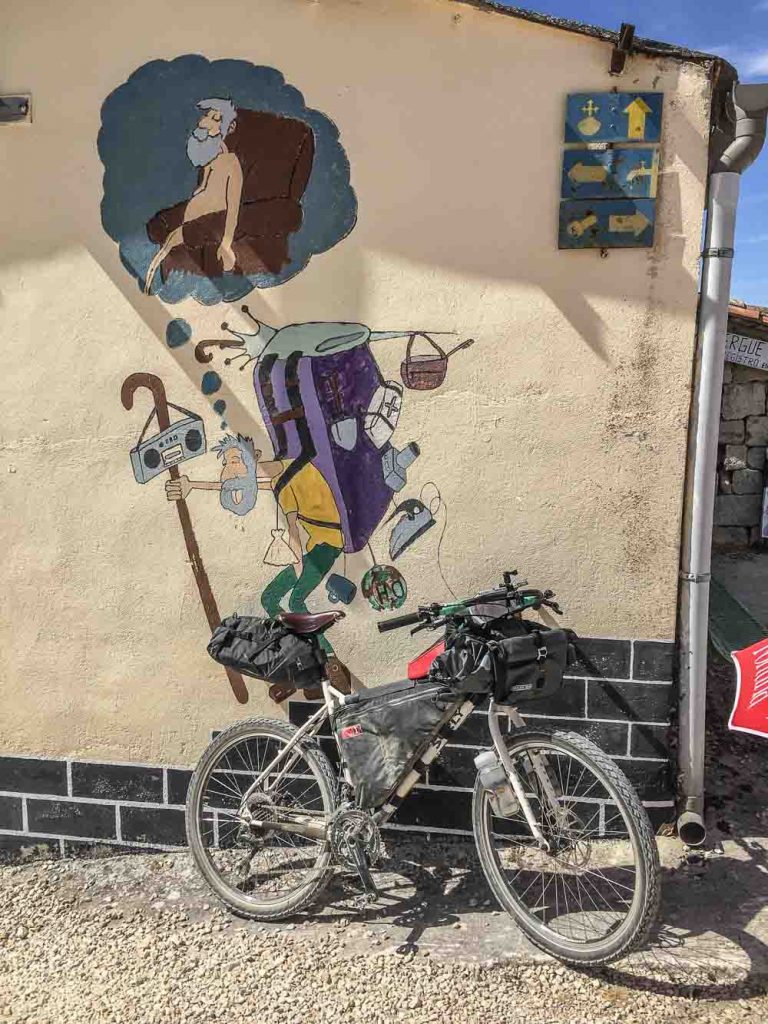
Camino use: As this setup is still quite new and more expensive, it is less common on the Camino. However, the advantages make it an excellent option to consider given that riding the Camino does not require camping and cooking gear which take up a lot of space and add weight. You wouldn’t need all the bags, and could consider adding the handlebar bag & seat bag to a rental bike if you were able to pack light.
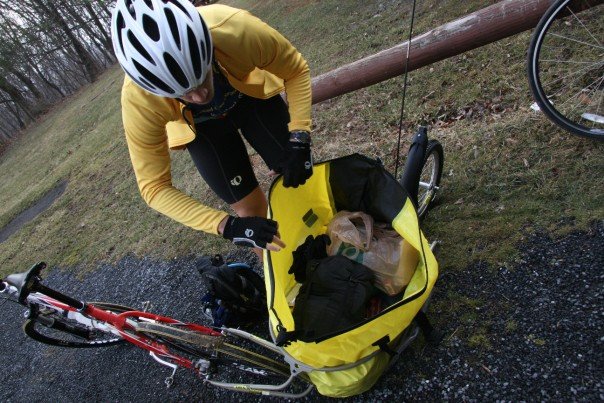
Trailers
Bicycle trailers such as the BOB Yak & Ibex have been industry standards. They attach to your rear axel, allowing compatibility with almost any bike. Many can carry huge loads (up to 70 lbs / 32 kg), and have a low profile which offers advantages in windy conditions. Trailer loyalists love the fact that everything is stored in one bag, and that it’s easy to detach the trailer to ride around town from their campsite or hotel. Some trailer options have suspension for rough trails to keep more control and minimize bouncing. Most use a 16″ or 20″ wheel, so be sure to carry an extra spare tube.
Camino use: Common with Spanish cyclists. Unless you are traveling from within Europe, flying with both your bike and a trailer will add complication and cost.
Backpacks
You will regret taking only a large backpack for bicycle touring, as your body will ache, your handling will be compromised, and you’ll be miserable in general. However, if you’re on a lightweight tour (like the Camino), a small backpack could be paired with a bikepacking setup or small panniers for heavy items to give the additional capacity you require.
If taking a backpack, consider bike-specific models and try to keep it lighter for your comfort, consider putting personal items there instead of a handlebar bag, or use it for hydration and eliminate the need for mounting water bottles.
Camino use: Not a standalone option. Small backpacks are somewhat common for hydration and consolidating personal items.
Bicycle Accessories for touring
Some of these items are standard for day rides, others are added considering a longer tour. If you’re a regular cyclist, you likely have most of this already. All items are essential unless noted as optional or for special conditions.
Clothing
- Helmet – a legal and safety requirement for riding in Spain
- Sunglasses – protect your eyes to stay safe from sun, bugs, and kicked up dirt
- Bike shorts – worth investing in a quality pair (or two), will protect you from chafing and saddle sores, will keep you cooler and streamlined, designed to be worn without underwear
- Bike jerseys – optional gear, but valued for back pockets for snacks, small water bottles and personal items (less important for touring), breathable and aerodynamic
- Bike shoes – optional gear, but a cycling-specific shoe will increase your efficiency (up to 20%) and control especially when attached to lipless pedals (SPD is most common style). If this is new to you, be sure to clip and unclip until it’s second nature before starting your tour. It’s best to have a shoe that you can use to push your bike along a slippery trail or walk around town comfortably, which favors many mountain bike designs (recessed cleat & tread) over road bike options (designed only for time on the bike)
- Bike gloves – optional, but will offer comfort, safety through better grip, and keep hands from going numb
- Rain jacket – bring something lightweight and bright, as visibility is limited when you’ll need it
- Rain pants – optional in warm weather, make sure they don’t interfere with your chainrings if not cycling specific. if camping or in remote areas, be sure to always have a dry set of closes on hand
- For colder weather, consider adding:
- Leg/knee warmers – often neoprene or fleece lined, these accessories convert your cycling shorts into pants and are easy to put on and talk off when the weather changes
- Arm Warmers – convertible sleeve that covers forearms and elbows
- Long-sleeve or fleece jersey – if it’s cold, just bring the extra warm layer, make sure it’s bright and visible
- Cycling pants or bibs – much warmer than cycling shorts, can also be worn on top of shorts
General Accessories
- Water bottles & cages – optional if you have a hydration pack. one large bottle or two small ones should be enough for the Camino as water is readily available
- Bike lock – make it a discipline to lock up (read more on bike security)
- Bike computer or GPS – optional, offers advantages of tracking your daily distance and speed for effective pacing, GPS offers navigation via free GPX tracks and pre-loaded base maps
- Blinking tail light and headlight– optional, but required in Spain for riding on roads at night, through tunnels and when visibility is extremely limited
- Pedals – lipless pedals/cycling shoes are strongly recommend, but flat pedals will also work fine. Consider options with a fat side and a clipless side. New bicycles do not include pedals in the purchase price.
Tools
- Multi-tool – make sure to have allen wrenches, flat and phillips-head screwdrivers, spoke wrenches, a torx driver if you have disc brakes, and a chain tool
- Bicycle pump – fix a flat, add pressure for smooth riding surfaces
- Tire levers – may be optional if you are accustomed to changing flats without them, but handy to have 1 or in your bag
- Any bike specific tools or tools that may be required to reassemble your bike such as
- Pedal wrench – required if your pedals are removed for transport and can not be attached with an allen wrench
- S&S Coupler wrench – If your bike has S&S couplers, be sure to always have this with you while riding
- For longer, remote, or rough terrain tours, consider adding
- Cone wrenches
- Adjustable crescent wrench
- Leatherman or Needle-nosed pliers
- Cassette remover tool
- And more, depending on your trip
Spare Parts & repair
- Tire & tube repair
- Inner tube(s) – one per person should be enough for the Camino, as more can be bought along the way
- Inner tube patch kits – make sure the cement has not dried out and you have at least 4 patches. Try to patch your tube before replacing it if you have the time
- Spare tire – optional and a matter of opinion depending on the quality and age of your tires, recommended for longer, remote tours where bike shops are far between
- Spare master link for chain – can be picked up from your local bike shop
- Electrical tape & duct – for many types of repairs, electrical tape helps with minimizing rubbing from accessories attached to frames and racks, and can be used for securing handlebar tape
- Chain lube and grease, rag – worth bringing along in a small container, can also be bought along the Camino if need be. keep your chain lubed and clean, especially after riding on wet days. when reassembling bike after a flight, you’ll need grease for your seat post, pedal threads, and handlebars/stem. Keep clipless pedals greased at cleat contact points to avoid creaks
- Assorted spare bolts & nuts – throw in a few replacement bolts (especially the ones that mount your racks to your frames, make sure they are relevant to your bike), zip ties, rubber strips from old tubes. On long trips and rough terrain, bolts can slowly loosen and work themselves out, so check often that they are snug
- For longer tours, consider adding spare:
- Spokes (3-4 covering required lengths) – if you doubt your wheel strength, have a qualified mechanic look at it before staring your tour. If touring in remote areas, be sure to know at least the basics of truing a wheel and replacing a broken spoke
-
- Brake and derailleur cables – Replace your cables before any long tour if you doubt them. If you brake a cable, you’ll need a spare for an emergency repair.
- Brake pads – Consider access to bike shops along your route. Not as important on the Camino if you start with new brake pads, can see when yours wear then, and are not an emergency repair. Pick a new pair up at a bike shop along the way if needed.
*Tubeless setup: If flying with a tubeless setup, be sure to not completely deflate your tires to conserve the rim/tire seal.
Camino-specific considerations:
- Remember that there are bike shops along the route, so you probably don’t need more than one extra inner tube and can buy replacement brake pads if need be. Many other cyclists are on the route, so if you really get stuck, it’s likely someone could stop by and help with a repair or offer a spare part.
- Maybe you’ll want a top-tube mounted wine rack!
Travel Gear for Bike Touring
The gear below is directly not bike-related, including as travel essentials clothing & footwear, electronics, personal items, toiletries, and first aid kits as well as camping and cooking gear for longer trips.
Overview
Keeping your gear and weight to a minimal weight and size is a primary concern for bicycle tours. Items on this page are considered critical equipment unless specified as optional. There are a wide variety of options available for all types of gear in these categories which range in price, weight and quality. Suggested makes and models are suggested where we feel it matters.
Clothing & Footwear
This is clothing and footwear primarily for off-bike use. Some items, such as shoes, socks, shirts, jackets, and sunglasses may be part of your cycling attire, depending how you built your kit.
Clothing
- Short sleeved shirts
- Long sleeved shirts
- Light jacket or fleece
- Pants
- Shorts
- Underwear
- Sports bras
- Rain jacket
- Rain pants
- Buff
- Hat/cap
- Sunglasses
- Swimsuit (optional)
- For colder trips, consider bringing
- Thermal underwear
- Insulating jacket (down, Primaloft, or fleece)
- Warm hat
Footwear
Some bikers opt for only one shoe that works for on and off the bike to save weight. Others feel it’s essential to have an off-bike shoe that is more comfortable to let their feet breathe, or walk around town at the end of the day.
- Socks
- Shoes for on the bike
- Shoes for off the bike (optional)
Personal Items
- Travel wallet: passport/ID, health insurance card, money, credit cards, ATM cards
- Headlamp
- Knife (optional)
- Navigation – guidebook or maps
- Earplugs
- Journal with pen/pencil (optional)
- Water bottles or hydration system
- Off-bike lightweight daypack (optional, can be substituted by handlebar bag with shoulder strap)
Toiletries
- Soap
- Shampoo/conditioner (100mL/4oz bottles)
- Toothbrush/toothpaste (travel sized)
- Toilet paper
- Laundry detergent (powder works well & weighs less)
- Sunscreen
- Lip balm
- Deodorant (optional)
- Contact solution (if necessary, replace at pharmacies)
First Aid Kit
This sample first aid kit is what we would take on a bicycle tour. Adapt to your own personal situation and health requirements.
- Any prescription medicine you need
- Variety of Baid-Aids/plasters, sterile gauze pads
- Antiseptic towelettes or wound disinfectant
- Antiobiotic ointment
- Medical tape
- Elastic bandage
- Pain reliever/fever reducer (such as acetaminophen or ibuprofen)
- Antihistamine (such as Benadryl)
- Anti-diarrheal medicine (such as loperamide hydrochloride/Immodium)
- Blister treatment (such as Moleskin or Compeed)
- Safety pins
- Small scissors or tweezers
Electronics (optional)
- Mobile phone & charger, headphones
- GPS
- Camera, charger, memory cards
- Tablet or e-reader
- Plug/currency converter (Euro plus are 220V with two round prongs. Most electronics run on 110-220V, requiring only a plug adaptor)
- Waterproof stuff sacks or zippered plastic bags to stay dry and organized
Camping Gear
*Optional for a Camino bike tour. Most cyclists do not camp and stay in affordable and frequent accommodations. Most albergues and guesthouses have full-service kitchens, which the exception of Galicia that has kitchens, but lacks in cookware.
Sleep System
- Tent, tarp or hammock
- Sleeping bag and/or bag liner
- Sleeping pad
Cooking Gear
- Stove
- Cookware
- Pot/pan
- Cup/mug
- Eating utensil
Packing List for Camino Cyclists
Packing for a bicycle pilgrimage will be similar to packing for a walking pilgrimage. The main differences will be that your clothing and shoes will be bike-specific, instead of a backpack you will carry your gear in panniers or bike bags, and you will need a few specialized bicycle items. The list below combines items from the above descriptions in one place.
Bike bags:
Configure your own setup to carry your gear on the bike, usually one of the following:
See Bike Touring Gear for more details.
- Rack and Panniers – likely two panniers on a rear rack will be sufficient storage volume for the Camino
- Bikepacking Bags
- Bike trailer – challenging to fly with, no common on Camino
Clothing
- Helmet
- Sunglasses
- Bike shorts (1-2 pairs)
- Short-sleeved shirts/jerseys, synthetic or wool, high visibility (1-2)
- Bike shoes
- Sandals or flip-flops for evenings
- Cycling socks (lightweight synthetic or wool)
- Bike gloves (optional)
- Waterproof jacket
- Underwear (2-3 pairs)
- Sports bras (2)
- Bandana or Buff
- Sandals or flip-flops for evenings
- Long-sleeved shirts/jersey or arm warmers (1-2 depending on season)
- Warm hat*
- Insulating jacket*
- *Leg/knee warmers
- *Arm Warmers
- *Cycling pants or bibs
Bike items:
- Frame pump
- Tire levers
- Spare tube
- Multi-tool with Allen wrench
- Patch kit
- Chain lube
- Grease
- Pedal wrench if needed to put pedals back on after packaging (many require only a multi tool)
- Helmet
- Mirror (optional but recommended)
- Water bottle cages/water bottles or other hydration system
- Bell
- Grease rag
Personal Gear:
- Sleeping bag or bag liner, lightweight, appropriate to season
- Navigation: guidebook, GPS (optional)
- Headlamp or flashlight/torch
- Sun protection: hat, sunglasses, sunscreen and lip balm
- Towel, lightweight travel type
- Water bottles and/or hydration system (1-2L)
- Pocket/utility knife
- Travel wallet: passport/ID, health insurance card, money, credit cards, ATM cards
- Earplugs
- Journal with pen/pencil (optional)
- Off-bike lightweight daypack (optional, can be substituted by handlebar bag with shoulder strap)
Footwear & Clothing
- Cycling shoes
- Sandals or flip-flops for evenings
- Cycling socks (lightweight synthetic or wool)
- Bike shorts (1-2 pairs)
- Short-sleeved shirts/jerseys, synthetic or wool, high visability (1-2)
- Long-sleeved shirts/jersey or arm warmers (1-2 depending on season)
- Light fleece or jacket
- Waterproof jacket
- Underwear (2-3 pairs)
- Sports bras (2)
- Bandana or Buff
- Leg warmers or cycling tights*
- Warm hat*
- Insulating jacket*
- Long underwear top/bottom*
*only necessary in cold seasons
Toiletries
Don’t pack too much. Bring small refillable travel bottles of shampoo and conditioner <100mL/4oz. Refill from items left behind (ask at the albergues) or buy your own refill and share.
- Shampoo/conditioner (100mL/4oz bottles)
- Toothbrush and toothpaste (travel sized)
- Soap, biodegradable bar or liquid, such as Dr. Bronner’s™
- Laundry detergent
- Toilet paper or tissues
- Deodorant (optionaL)
- Hand sanitizer (optional)
- Contact solution (if necessary), replace at pharmacies
- Chamois anti-chafe cream
First Aid Kit
This sample first aid kit is what we would take on a bicycle tour. Adapt to your own personal situation and health requirements.
- Any prescription medicine you need
- Variety of Band-Aids/plasters, sterile gauze pads
- Antiseptic towelettes or wound disinfectant
- Antibiotic ointment
- Medical tape
- Elastic bandage
- Pain reliever/fever reducer (such as acetaminophen or ibuprofen)
- Antihistamine (such as Benadryl)
- Anti-diarrheal medicine (such as loperamide hydrochloride/Imodium)
- Blister treatment (such as Moleskin or Compeed)
- Safety pins
- Small scissors or tweezers
Electronics (all optional)
- Mobile phone & charger, headphones
- GPS
- Camera, charger, memory cards
- Tablet or e-reader
- Plug/currency converter (Euro plus are 220V with two round prongs. Most electronics run on 110-220V, requiring only a plug adaptor)
- Waterproof stuff sacks or zippered plastic bags to stay dry and organized